How Much Can You Print With 1kg of Filament
Every bit a newbie to 3D press, this is the question that may take been bothering yous for months. Y'all're always on the lookout for materials to print your models with and have tried polylactic acid (PLA), Acrylonitrile butadiene styrene (ABS), Architectural Acrylic (aka shiny mucilage), and more.
But you lot proceed wondering, how long does one kg of filament last? How many meters of filament are there in a 1kg spool? How much filament do you lot demand for an average Print? How many models can yous print with a 1Kg spool? How tin you lot make Filament final longer? And what factors can touch on it?
Luckily, in the following article, I volition answer all of these questions.
| Filament Weight | Density | Thickness | Length | Cost |
|---|---|---|---|---|
| 1Kg | 1.25g/cm3 | i.75mm | 330m/1080ft | $twenty-30 |
| 300mm | 110m/360ft | |||
| 3Kg | one.25g/cm3 | 1.75mm | 990m/3240ft | $55-70 |
| 300mm | 330m/1080ft | |||
| 5Kg | 1.25g/cm3 | one.75mm | 1650m/5400ft | $90-110 |
| 300mm | 550m/1800ft |
At present, before we beginning, let'due south keep in heed that the filaments for standard desktop FDM 3D printers are ordinarily bachelor in 1kg, 3kg, and 5kg rolls called "Spool".
A standard 1kg filament spool costs around twenty-30 US dollars. Simply it can cost significantly more than in countries with high import taxes.
Now let's answer ane question earlier nosotros get into the post itself: Why are these filament spools sold in Kgs instead of Meters/Feet? Well, the answer is elementary, the length of filament inside a spool depends on two factors, i.e. the density of the material and the cantankerous-sectional area, or bore of the filament.
Let me evidence yous how to calculate the length of a 1kg filament spool with an example. Suppose you have bought a PLA filament spool of 1kg which has a density of ane.24g/cm3 with ane.75mm of diameter. It volition incorporate 252.thirteen meters of filament (in that location are many calculators available on the internet that can perform these calculations for you). If the price of the spool was $25 then it would accept toll 9.9 cents per meter.
At present, without any further ado, let'due south get into the post itself!
- How much filament do you demand for an average Print?
- How to bank check the corporeality of filament the print volition need in the slicer software?
- How can you make Filament last longer?
- 1) Reduce the Size of the 3D Models
- 2) Reduce the use of Brims, Rafts, and Skirts
- 3) Reduce the utilize of Supports (if at all possible)
- 4) Reduce the Infill
How much filament practice you need for an average Print?

Or in other words, how many times can I print a single object with a 1kg spool?
The easiest way to answer is to summate (in grams) the weight of the object (including its supports, brims, rafts, and skirts) you are about to print because you can merely impress exactly 1kg of material from a 1kg spool.
Let'south assume that the custom iPhone case you are printing and selling on the cyberspace weighs 11.8 grams. Then you tin can impress yard/eleven.viii = 84 iPhone cases if you use all of the filament without wasting information technology.
Similarly, permit'due south suppose the custom necklace y'all are making costs five grams and then you tin can print thousand/v = 500 necklaces. This will only help those people who wish to print the aforementioned object multiple times to either gift it to their friends and family unit or sell information technology online.
Random Tip: If you are printing multiple objects of the aforementioned size, information technology is better to print them as multiple parts then assemble them.
For example, if you lot want to print earring shaped pendants (1.25 inches in diameter circle), don't impress one band with a wall thickness of 0.8 mm, considering when you lot plough information technology sideways or drop information technology, its shape is going to be distorted; instead, design each earring equally a pair of circles with a shared hole on the rim and join them
How to check the amount of filament the print volition demand in the slicer software?
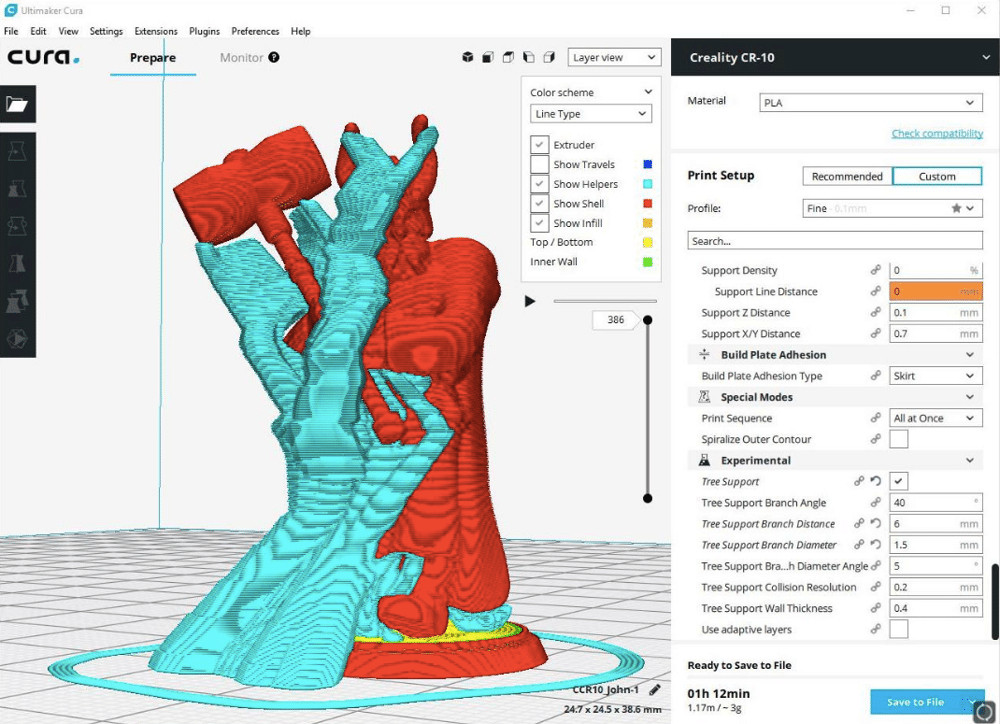
Slicing softwares tell you the estimated print time when y'all load an object's design file (although it is never accurate), they also tell you how much filament will exist needed in grams to print the object (this is usually quite accurate).
In the figure below, you tin see that Cura is telling me that, to print my object it volition consume 582 grams which is more than than half a kg. For me, it is always a red flag, and I avoid printing objects that need anywhere almost 500 grams.

The reason is that it volition accept a lot of time commonly one or 2 days (if you take a decent quality printer information technology won't be an issue to start a print and get out the printer to finish it on its own) but the problem is that the print may need you lot to change spools midway and a lot can become incorrect while doing this.
I'm usually able to overcome such issues by making a few small-scale changes in my pattern or sometimes by even changing the orientation of the object in the slicing software. Equally you tin can see below, when rotating the object horizontally, the number of grams needed to print this object dropped from 582 grams to 452 grams.

By making such a small-scale adjustment, I was able to save almost 130 grams! You must be wondering how is it possible.
Well, it is elementary, past printing the object horizontally instead of vertically, information technology will demand a lot less back up. I did simple calculations, I had bought this 1kg spool for $30, and past making this modest adjustment, I was able to save $iv and that'due south more than than 1/10th of what I paid for the spool.
How tin yous brand Filament last longer?
At that place are iv ways you can do that, so let'southward talk over each of them in fine detail.
- Reduce the Size of the 3D Models
- Reduce the utilise of Brims, Rafts, and Skirts
- Reduce the use of Supports (if at all possible)
- Reduce the Infill
1) Reduce the Size of the 3D Models
Every time makers are printing something huge without carefully thinking why they need to impress it that large there is a gradual subtract in details when you increase the size, but there will be a ten folds increase in material cost, time consumption, and many other things also which get in hard to continue 3D printing larger objects
Either don't print equally oft or don't print big size object. At that place is no point in press large objects, smaller ones too look just equally good, if non cooler. If you retrieve that people get impressed by seeing large-sized prints, don't forget that they too get impressed by seeing finer intricate details on smaller objects too.
I will say information technology over again, at that place is no point in printing big objects and they should merely be printed when you demand to print a 1:one prototype or role. Therefore, try to control the temptations and always ask yourself, practise I really to impress it this big?
2) Reduce the use of Brims, Rafts, and Skirts
A Skirt is a routine of filament extrusion that you can set up in your slicer to perform right before the beginning of your printing job. Information technology consists of an outline that surrounds your print and is aimed at ensuring that the extruder is properly primed and that a constant flow of filament is extruded when the object starts printing.
A skirt as well helps the user in determining if the machine is well-calibrated. If you are not satisfied with the quality of the lines being placed on the build plate, you can accommodate the bed before it affects your object.
A brim consists of a skirt that is attached to your model. It is useful for enlarging the surface of the offset layer, thus improving the adhesion of the model to the build plate. It is attached to the model is also its master disadvantage, since you have to be conscientious not to damage the model when removing the brim.
Finally, the raft is a latticework that gets printed beneath the object. By doing then, your model volition but exist in contact with the raft and not with the build plate. This feature is mainly used as a way to avert warping when press with ABS. It takes some fourth dimension to print and consumes a nontrivial amount of filament, and so only use it when necessary.
The main advantage of skirts is that they don't eat as much filament as rafts and brims. On the other paw, and in contrast to brims and rafts, skirts do not ameliorate your layer adhesion. Since they are non fastened to the object, they practice not brand the bottom surface larger.
To be clear, I'1000 not maxim that you should avoid using these features at all costs. In fact, I always use a skirt of 3 lines on my default profile. Too, when I'grand concerned virtually the object getting loose because information technology only has a small contact surface, I don't double guess whether to add together or not a brim.
The master takeout of this recommendation is that you should properly choose when to utilize a raft, a skirt, or a brim based on the specific object yous are about to impress.
iii) Reduce the utilize of Supports (if at all possible)
Those new to 3D printing often fail to recognize the importance of supports. They serve as a foundation for parts that are difficult or incommunicable to print otherwise and can fifty-fifty improve the quality of an avant-garde print.
Non everyone can blueprint awesome 3D designs and manage to relieve on filament costs; it's an acquired skill that takes fourth dimension and experience to master.
A lot of 3D models on Thingiverse have too many supports considering the Thingiverse search hardly takes into business relationship how much printing cloth is wasted on them. But there is no reason why you should not make simple adjustments that tin save you lot fourth dimension and coin.
It'due south not even that difficult, as you saw in the case above, I was able to relieve $4 worth of filament past just rotating my design from vertical layout to horizontal layout in the slicing software.
Slic3r and other Slicing software allow you lot to customize the thickness of the back up material. This is a very effective method to reduce how much material is needed, or in some cases forbid you from needing support material entirely.
four) Reduce the Infill
Infill is the amount of cloth used within a model. When y'all select the infill per centum, this is how much of that percent of fabric will fill in the gaps between the walls outside the print.
While it'south technically possible to print with 100% infill, we did discover that there are some benefits to printing with less. For starters, any parts that demand back up – tools or other objects with overhanging pieces – will ofttimes impress better at lower infills. When it comes to infill percentages, many experts advise against using anything over 50%. Some fifty-fifty encourage you to stick with 20% infill and beneath.

Merely it'due south no secret that low-cost printers have trouble printing loftier-quality parts. With a large amount of infill, you lot'll get more than forcefulness and immovability out of your machine but yous'll also sacrifice overall print fourth dimension.
For most applications, percentages in a higher place 50% are non necessary. Nevertheless, if you lot are looking for forcefulness and durability, a threescore%-infill build should be enough to support your needs.
These recommendations are made to ensure that you go a stiff and stable print without adding too much weight. This is particularly important when y'all're printing large models, every bit they typically demand quite a bit of infill to stay sturdy.
The main problem when trying to decide what infill design to use, but the honeycomb and hexagon patterns are usually expert picks to do this.
The honeycomb-shaped infill is the fastest and to the lowest degree textile-intensive design.
To make a hollow clear figure, we can utilize infill to create space while keeping a solid outer shell. Substantially the honeycomb infill is the strongest and a good choice if force is important for your model.
For miniatures or models where strength may not matter much, the hexagonal infill pattern might be the best i to go with.
girdlestonehaversidne.blogspot.com
Source: https://3dsolved.com/how-long-does-1-kg-of-3d-printer-filament-last/
0 Response to "How Much Can You Print With 1kg of Filament"
Post a Comment